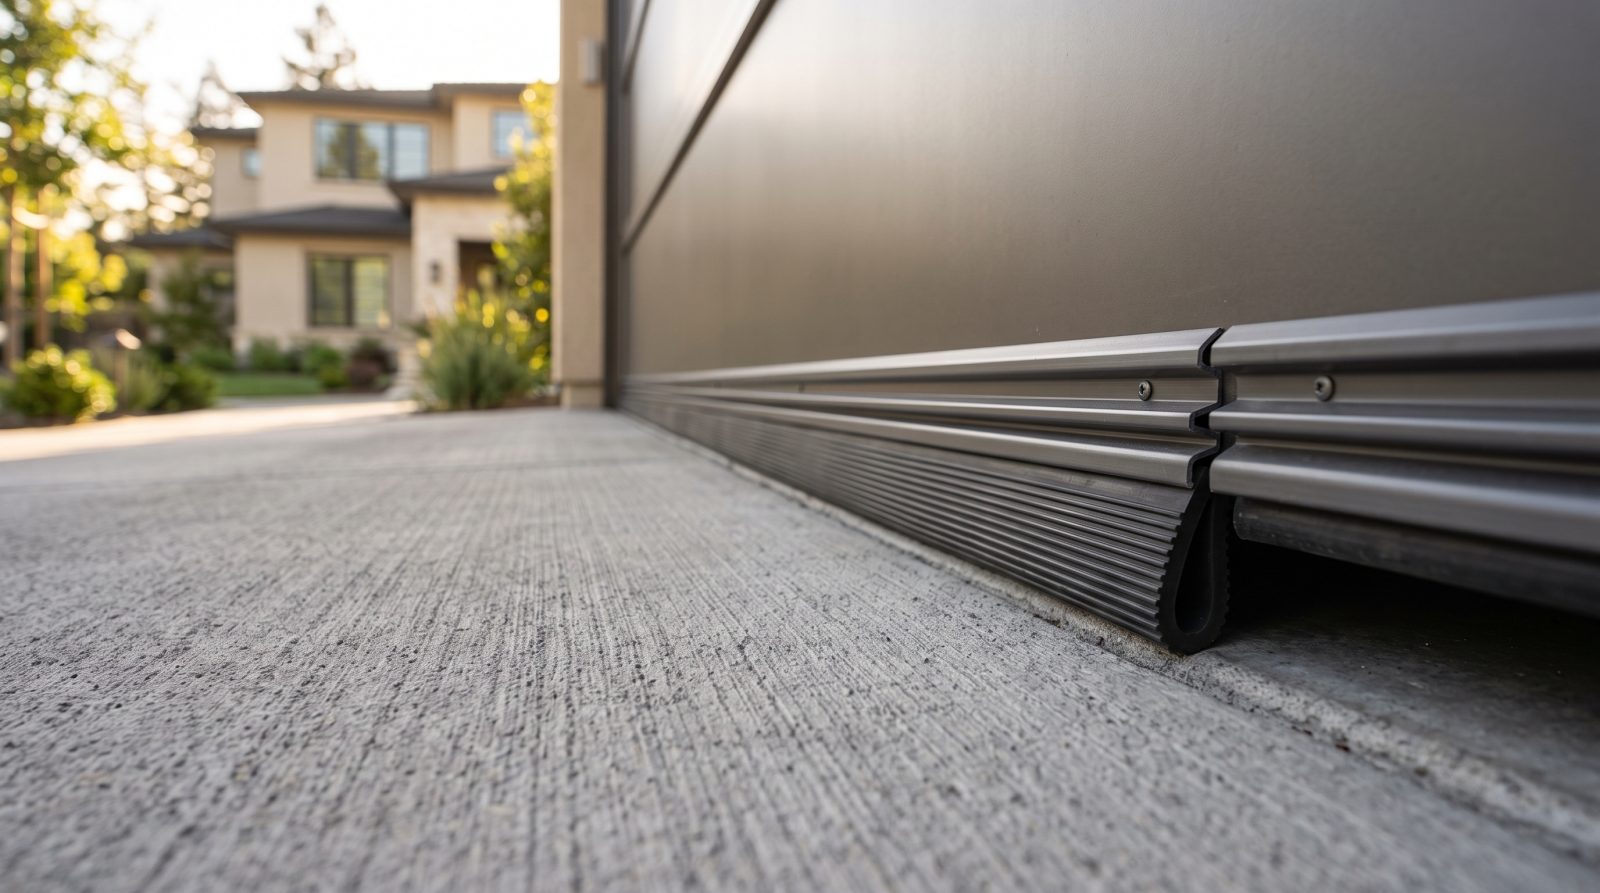
The Four Parts of a Garage Door Seal System
Most homeowners think of garage door weatherstripping as a single piece, but a fully sealed door actually relies on several distinct components working together. When even one fails, the whole envelope leaks. Understanding the system helps you diagnose where your drafts and water are really coming from before you spend money on the wrong fix.
Each component sits at a different point of contact and faces different wear. The bottom seal takes the most abuse because it bears the door's weight and flexes against the floor on every cycle, so it almost always fails first. The perimeter and panel seals tend to degrade slowly from UV exposure and temperature swings, which is why a door can look fine while quietly losing efficiency for years.
- Bottom seal (astragal): the U-shaped, T-shaped, beaded, or bulb-style rubber or vinyl gasket that compresses against the floor to close the gap under the door.
- Bottom retainer/track: the aluminum channel mounted to the bottom panel that the bottom seal slides into; a bent or corroded retainer keeps a new seal from sitting flat.
- Perimeter weatherstripping (jamb seal): the flexible flap nailed or screwed to the side and top of the door frame that the door closes against to block side and top drafts.
- Panel/section seals: the thin interlocking gaskets between horizontal door sections that block air and light at the seams on insulated doors.
- Threshold seal: an optional rubber strip bonded to the garage floor itself, used to bridge an uneven slab or keep out water and pests when the floor, not the door, is the weak point.
Bottom Seal Types and How to Identify Yours
Replacing a bottom seal goes wrong most often for one reason: buying the wrong profile. The seal has to match the shape of the retainer on your door's bottom edge, and there is no universal fit. Before ordering anything, the single most useful thing you can do is look at the bottom of your door and identify the retainer style.
The most common retainer on residential steel doors is the dual-channel aluminum type, which takes a T-style or bulb seal that slides in from the side. Older or wood doors may have a single-channel U-shaped retainer, or the seal may simply be nailed flat to the bottom edge with no channel at all. Measuring the channel-to-channel spacing and the width of the door takes two minutes and prevents a frustrating return.
Profile shape also affects performance. A bulb or P-shaped seal conforms better to uneven concrete floors and is the better choice when your slab has dips or a slope. A T-style or bead seal works well on flat, level floors and is easy to slide in and out for future replacement.
- T-style (single or double bead): slides into a dual-channel aluminum retainer; the common standard on modern steel doors.
- Bulb / P-bulb: a rounded hollow profile that compresses to fill larger or uneven floor gaps, well suited to older slabs and sloped floors.
- U-shape / J-channel: fits a single-channel retainer common on some wood and vintage doors.
- Beaded / push-in: small beads on each edge that retain in matching grooves; verify bead spacing before ordering.
- Nail-on flat seal: a flat strip fastened directly to a wood bottom rail when there is no retainer at all.
When to Replace Versus When You Need a New Door
Weatherstripping is a wear item, not a permanent part. Rubber and vinyl lose their flexibility as they age, and once a seal goes stiff it can no longer compress to fill gaps. As a general rule of thumb, bottom seals last several years and perimeter weatherstripping somewhat longer, but climate accelerates everything: intense sun, hard freezes, and salt air all shorten seal life considerably.
There are clear signs it's time to reseal. If you can see daylight under or around a closed door, feel a draft, find water or snowmelt tracking inside, notice the rubber has gone hard and cracked, or see the seal sagging or torn, replacement is due. A fresh seal on an otherwise sound door is one of the best low-cost improvements you can make.
Sealing has limits, though, and this is where our focus on replacement matters. New weatherstripping cannot compensate for a door that is the real problem. If the door is non-insulated single-layer steel, if panels are dented or rusting through, if the door is warped so it no longer meets the floor evenly, or if you are constantly chasing leaks on a 20-plus-year-old door, you are sealing a structure that has reached the end of its service life. In those cases, a new insulated door with a properly matched seal package solves the comfort and efficiency problem permanently rather than for a season.
- Reseal it: the door is otherwise solid, panels are straight, and only the rubber has aged or torn.
- Consider replacing the door: chronic leaks, dents or rust, a warped bottom edge, a thin non-insulated door, or seals that fail again within a year.
- Address the floor instead: drafts and water persist even with a good door seal because the slab is cracked, sloped, or uneven; a threshold seal may be the right tool.
- Upgrade the whole envelope: if you are conditioning or finishing the garage, replacing the door and adding full perimeter and threshold sealing together pays back in comfort.
Material, Climate, and Insulation: Specifying Seals for Performance
Seal material is not a small detail, especially across the wide range of climates in the United States. The compound that performs beautifully in a mild coastal region can crack within a season in a hard-freeze winter or chalk and split under desert sun. Choosing the right material is the difference between a seal that lasts years and one you replace annually.
EPDM rubber is generally among the most weather-resistant choices and holds its flexibility across a broad temperature range, which makes it a strong pick for cold and freeze-thaw climates where vinyl can stiffen and crack. Vinyl and TPE seals are cost-effective and perform well in temperate regions but tend to harden in deep cold and can become brittle over time in extreme heat. In coastal and salt-air areas, corrosion of the aluminum retainer is often the hidden failure point, so a stainless or well-coated retainer matters as much as the rubber itself.
Sealing also works hand in hand with insulation, which is central to a smart new-door purchase. A seal stops air and water at the edges; insulation slows heat transfer through the door face. Buying a sealed but uninsulated door for an attached garage, a garage gym, or a workshop leaves most of the comfort gain on the table. When you specify a new door, treat the seal package and the door's R-value as one decision: an insulated steel or composite door with EPDM perimeter and bottom seals delivers a tight, quiet, temperature-stable opening that no amount of aftermarket weatherstripping can replicate on a hollow door.
- Cold / freeze-thaw regions: prioritize EPDM rubber that stays pliable below freezing; pair with an insulated door to help prevent condensation and ice buildup.
- Hot / arid regions: choose UV-stable compounds and inspect seals yearly, since heat and sun are the main agents of cracking and chalking.
- Coastal / humid regions: protect against corrosion with stainless or coated retainers and fasteners; humidity-resistant seals reduce mildew at the seams.
- Conditioned or finished garages: combine a high-R-value insulated door with full perimeter, panel, and bottom seals so the envelope actually holds temperature.
What a Quality Seal Replacement or New-Door Install Looks Like
A proper bottom seal replacement is straightforward but precise. The door is opened and supported, the old seal is slid or pried out of the retainer, the channel is cleaned of debris and corrosion, and the new seal is fed in with a little lubricant so it tracks evenly without twisting. The seal is then cut to length with a slight overhang and the door is cycled to confirm it compresses flat against the floor along its full width. Perimeter weatherstripping is replaced by pulling the old flap, cleaning the jamb, and fastening fresh stripping so the flexible edge just kisses the closed door without binding it.
When sealing is part of a new door purchase, the difference is that the seals are matched to the door and the opening from the start. The installer verifies the floor is reasonably level, sets the bottom retainer true, selects a seal profile that suits your slab, and ties the perimeter and section seals into the door's insulation so the whole assembly is engineered as one weather barrier. That integrated approach is exactly why a new, properly sealed door outperforms years of patching seals onto an aging one, and it is the standard we point homeowners toward.
Whether you are resealing a sound door or weighing a full replacement, the smart move is to match the right materials and profiles to your door, your floor, and your climate, then verify the seal actually closes the gap. If you would like help deciding whether to reseal or replace, request a free quote and we can walk you through the options for your specific door and region.
- Door supported and powered down safely before the bottom retainer is touched.
- Retainer channel cleaned and inspected; a bent or corroded retainer is straightened or replaced so the new seal sits flat.
- Seal profile matched to floor condition: bulb for uneven slabs, T-style for flat floors.
- New seal cut with a slight overhang and the door cycled to confirm full-width contact with the floor.
- Perimeter and section seals checked together so the entire opening is sealed, not just the bottom.